For Parents
Welcome Parents!
8th Grade Registration – August 3, 2026
7th Grade Registration – August 4, 2026
WEB Day (New Students/7th Graders) – August 7, 2026
First day of School – August 12, 2026 (Period 1 begins at 8:45am)
Back to School Night – August 27, 2026 (5:30pm – 7pm)
When you first log into the Parent Portal, you will see a message telling you that you have not completed the Data Confirmation process for your student.
If you are using the old Parent Portal interface, it will appear as a yellow banner near the top of your page.
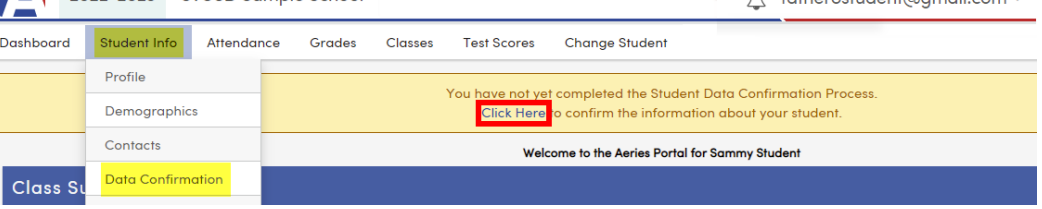
In either interface you can click on the Click Here link (framed in red), or you can click on the Student Info menu and choose Data Confirmation (highlighted). There are 8 tabs in the Data Confirmation process, and parents will have to complete each one before moving on to the next step. Once a step is completed, the number of the step will be replaced with a check mark, and parents will automatically be moved to the next step.
- Family Information
- Income
- Student Demographics
- Contacts
- Medical Conditions
- Documents
- Authorizations
- Final Data Confirmation
Step 1 - Family Information
- Select one of the options
- Click on Confirm and Continue button
Step 2 - Income
- Enter the number of people in your household (if 6 or more, use the arrows to increase or decrease the number)
- Choose your total monthly household income (the amounts will automatically adjust depending on the number of people in your household)
- Click on the Confirm and Continue button
- A window will pop-up asking you to verify the information you entered. Click OK if it is correct or Cancel if you need to change it.
Step 3 - Student Demographics
- Click on the Change button if any of the data needs to be updated. (Skip to step 2 if all data is correct.)
- Click on the Confirm and Continue button.
Step 4 - Contacts
- Click on the pencil button if any of the contact records listed need to be updated or deleted.
- Click on the Add button if any new contacts need to be entered.
- Click on the Confirm and Continue button (skip to this step if there are no changes to the contact information.)
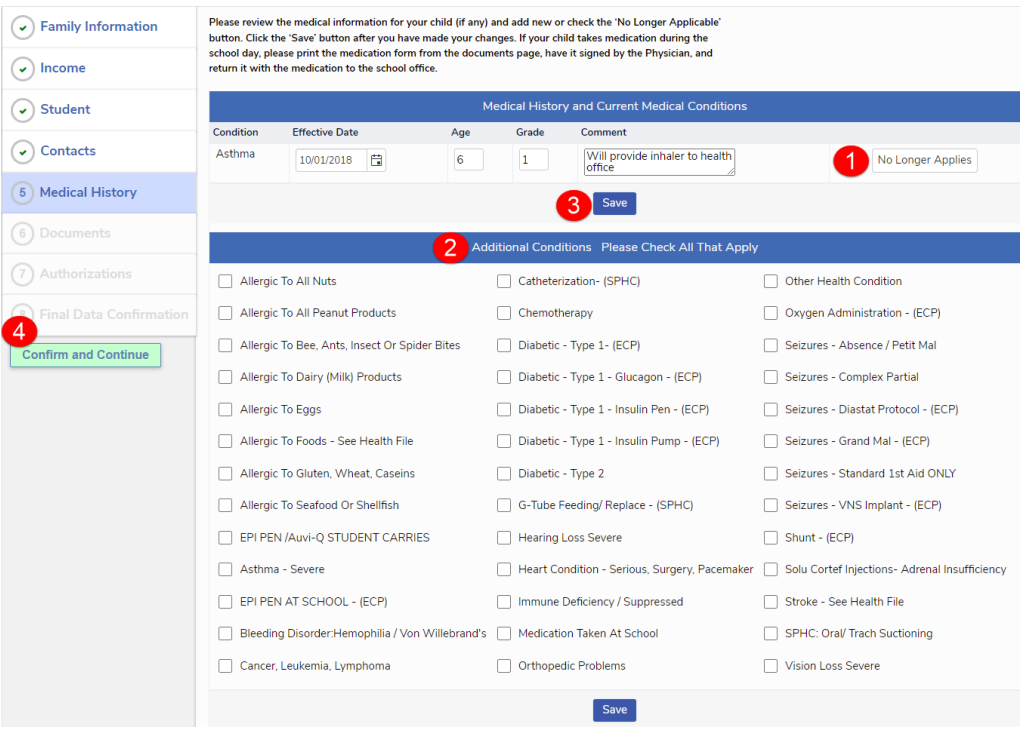
Step 5 - Medical Conditions
- If your student no longer has a medical condition that is listed, click on the No Longer Applies button.
- Click on any additional medical condition that your student has and add details if required.
- When all changes are complete, click on the Save button (there is also a Save button on the bottom of this page).
- Click on the Confirm and Continue button (skip to this step if there are no changes to the medical information or no medical conditions to enter).
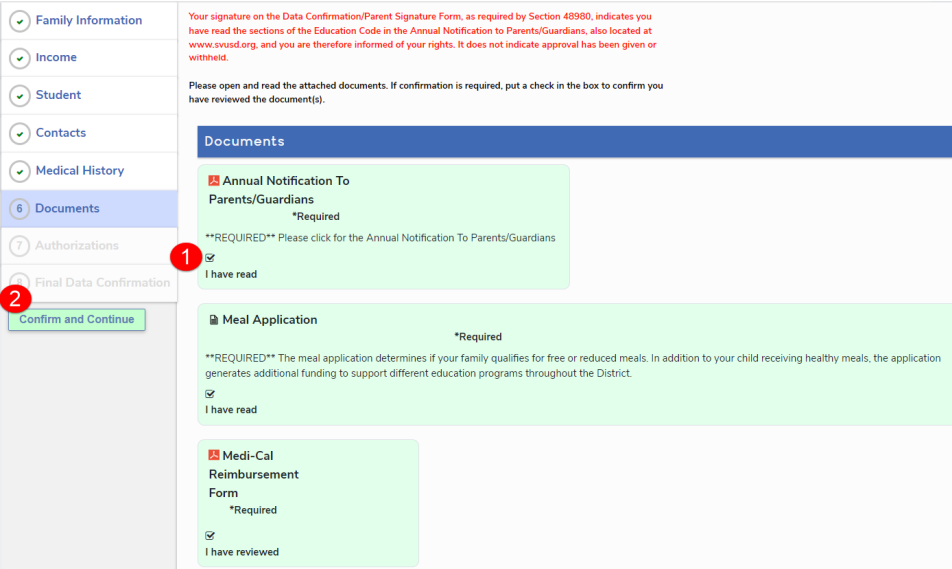
Step 6 - Documents
- Click on each document listed. The document or link will open up in a new tab. Review the document, printing it if it applies to your student and needs to be printed.
- Once every document has a checkmark by it and has been shaded green (signifying that you have opened it), you will be able to click on the Confirm and Continue button.
Step 7 - Authorizations
- Choose a response for every authorization (certain authorizations do not apply to all grade levels).
- Click on the Save button.
- Click on the Confirm and Continue button.
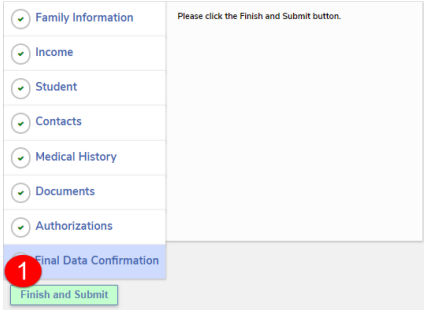
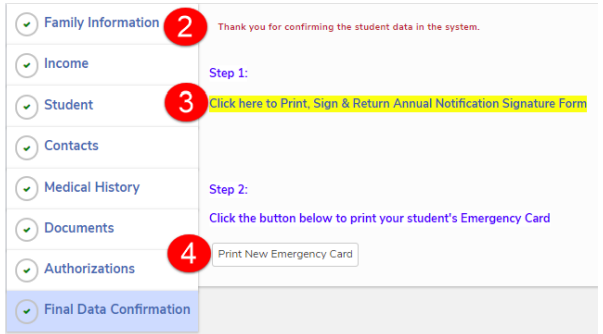
Step 8 - Final Data Confirmation
- Once all steps are completed, you can go back and review your responses by clicking on any of the tabs. When you are ready to submit your data, click on the Finish and Submit button.
- You will receive a message thanking you for confirming your student’s data.
- Click on the link to print and sign the Annual Notification Signature Form. This form must be printed and a hard copy with student and parent signatures turned in during our on-campus Registration.
- Click on the button to Print New Emergency Card for your student. This will show you all of the information you have just confirmed. This form must be printed and a hard copy with student and parent signatures turned in at Bullring Registration as proof that you have completed the online Data Confirmation process.
Completing Data Confirmation for Multiple Students
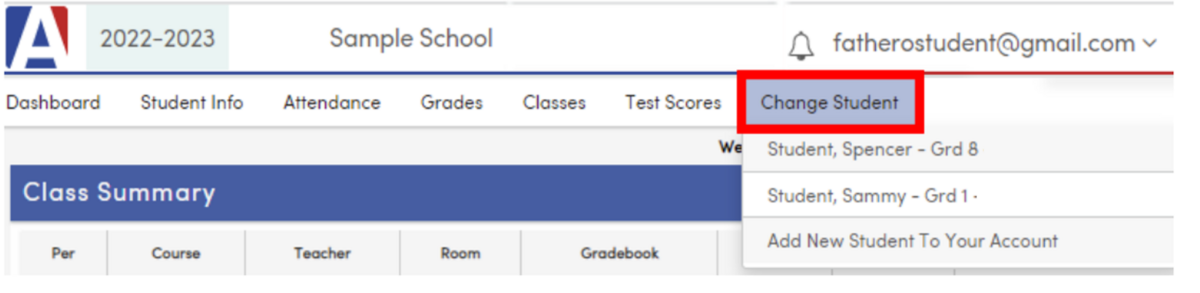
The Data Confirmation process must be completed separately for each student enrolled in TCUSD. When using the old Parent Portal interface, click on the Change Student menu and choose the next student you need to complete Data Confirmation for.
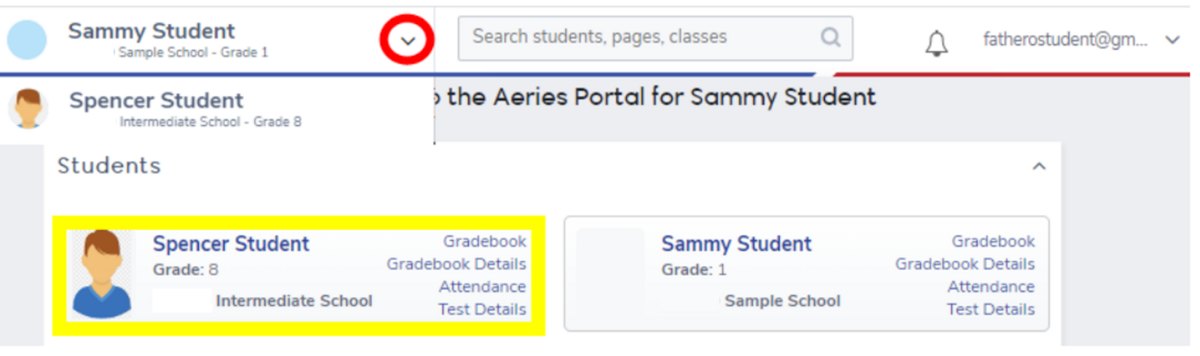
When using the new Parent Portal interface, click on the student’s card (highlighted in yellow) on the home page, or click on the down-pointing arrow (circled in red) in the header to see your list of students.
Attendance Matters!
Please report all absences by including your full name, your student's full name ,grade, and reason for the absence. Please call the office if you are planning to bring your student in late or are picking up your student early so that we may best assist you.
When coming to pick up your student early please ensure you are listed on their emergency contact sheet on Aries and please be prepared to show ID.


Technology Support for Parents:
Canvas 101 - Parent/Guardian's orientation explaining notifications for our parents
Here is the link for that orientations notifications webpage:
The video provides step-by-step instructions on how to get to the notification preferences and how to set them to the individuals preference.
Here is a way to set it up for the Parent App (Easiest missing assignment settings are here):
How parents can become observers in Canvas - Here’s a video you can share with your parents on how parents can become observers on your Canvas page.
- To stay up-to-date on everything that is going on with PTA, please like our PTA Facebook Page
- Click here to Join Our PTA
If you have any questions at all – please email OakAvePTA@gmail.com.
-
8th Grade Registration – August 3, 2026
7th Grade Registration – August 4, 2026
WEB Day (New Students/7th Graders) – August 7, 2026
First day of School – August 12, 2026 (Period 1 begins at 8:45am)
Back to School Night – August 27, 2026 (5:30pm – 7pm)
-
-
When you first log into the Parent Portal, you will see a message telling you that you have not completed the Data Confirmation process for your student.
If you are using the old Parent Portal interface, it will appear as a yellow banner near the top of your page.
In either interface you can click on the Click Here link (framed in red), or you can click on the Student Info menu and choose Data Confirmation (highlighted). There are 8 tabs in the Data Confirmation process, and parents will have to complete each one before moving on to the next step. Once a step is completed, the number of the step will be replaced with a check mark, and parents will automatically be moved to the next step.
- Family Information
- Income
- Student Demographics
- Contacts
- Medical Conditions
- Documents
- Authorizations
- Final Data Confirmation
Step 1 - Family Information
- Select one of the options
- Click on Confirm and Continue button
Step 2 - Income
- Enter the number of people in your household (if 6 or more, use the arrows to increase or decrease the number)
- Choose your total monthly household income (the amounts will automatically adjust depending on the number of people in your household)
- Click on the Confirm and Continue button
- A window will pop-up asking you to verify the information you entered. Click OK if it is correct or Cancel if you need to change it.
Step 3 - Student Demographics
- Click on the Change button if any of the data needs to be updated. (Skip to step 2 if all data is correct.)
- Click on the Confirm and Continue button.
Step 4 - Contacts
- Click on the pencil button if any of the contact records listed need to be updated or deleted.
- Click on the Add button if any new contacts need to be entered.
- Click on the Confirm and Continue button (skip to this step if there are no changes to the contact information.)
Step 5 - Medical Conditions
- If your student no longer has a medical condition that is listed, click on the No Longer Applies button.
- Click on any additional medical condition that your student has and add details if required.
- When all changes are complete, click on the Save button (there is also a Save button on the bottom of this page).
- Click on the Confirm and Continue button (skip to this step if there are no changes to the medical information or no medical conditions to enter).
Step 6 - Documents
- Click on each document listed. The document or link will open up in a new tab. Review the document, printing it if it applies to your student and needs to be printed.
- Once every document has a checkmark by it and has been shaded green (signifying that you have opened it), you will be able to click on the Confirm and Continue button.
Step 7 - Authorizations
- Choose a response for every authorization (certain authorizations do not apply to all grade levels).
- Click on the Save button.
- Click on the Confirm and Continue button.
Step 8 - Final Data Confirmation
- Once all steps are completed, you can go back and review your responses by clicking on any of the tabs. When you are ready to submit your data, click on the Finish and Submit button.
- You will receive a message thanking you for confirming your student’s data.
- Click on the link to print and sign the Annual Notification Signature Form. This form must be printed and a hard copy with student and parent signatures turned in during our on-campus Registration.
- Click on the button to Print New Emergency Card for your student. This will show you all of the information you have just confirmed. This form must be printed and a hard copy with student and parent signatures turned in at Bullring Registration as proof that you have completed the online Data Confirmation process.
Completing Data Confirmation for Multiple Students
The Data Confirmation process must be completed separately for each student enrolled in TCUSD. When using the old Parent Portal interface, click on the Change Student menu and choose the next student you need to complete Data Confirmation for.
When using the new Parent Portal interface, click on the student’s card (highlighted in yellow) on the home page, or click on the down-pointing arrow (circled in red) in the header to see your list of students.
-
Attendance Matters!
Please report all absences by including your full name, your student's full name ,grade, and reason for the absence. Please call the office if you are planning to bring your student in late or are picking up your student early so that we may best assist you.
When coming to pick up your student early please ensure you are listed on their emergency contact sheet on Aries and please be prepared to show ID.
-
Technology Support for Parents:
Canvas 101 - Parent/Guardian's orientation explaining notifications for our parents
Here is the link for that orientations notifications webpage:The video provides step-by-step instructions on how to get to the notification preferences and how to set them to the individuals preference.
Here is a way to set it up for the Parent App (Easiest missing assignment settings are here):
How parents can become observers in Canvas - Here’s a video you can share with your parents on how parents can become observers on your Canvas page.
-
Hey Oak Families! - To stay up-to-date on everything that is going on with PTA, please like our PTA Facebook Page
- Click here to Join Our PTA
If you have any questions at all – please email OakAvePTA@gmail.com.